Unlock Freshness: Your Ultimate Guide on How to Pack a Salad in a Jar
Are you tired of lackluster, soggy lunches that leave you feeling uninspired? Imagine a world where fresh, vibrant salads are always at your fingertips, perfectly crisp and ready to eat, no matter how busy your week gets. This isn't a culinary dream; it's the reality of mastering how to pack a salad in a jar. For over a decade and a half, the humble mason jar has revolutionized meal prep for countless individuals, transforming the way we approach healthy eating and lunchtime convenience. It’s a simple, ingenious method that promises not just a meal, but a consistently delightful experience, saving you time, money, and the dread of a wilted salad.
Why Mason Jar Salads Are a Game-Changer for Busy Lives
The enduring popularity of mason jar salads isn't just a trend; it's a testament to their unparalleled effectiveness. They truly work, offering a multitude of benefits that make healthy eating an effortless part of your routine:
- Unmatched Freshness, Days Longer: Properly packed, your salad can remain crisp and delicious for up to a full week. This longevity is crucial for effective meal planning.
- Effortless Batch Prepping: Dedicate just 30-60 minutes on a Sunday, and you can prepare all your lunches for the entire work week. This foresight liberates valuable time during your busy weekdays.
- Say Goodbye to Soggy Lettuce: The secret lies in the specific layering technique. By strategically placing ingredients, you create a natural barrier that keeps delicate greens pristine, ensuring no soggy surprises, even on day seven.
- Ultimate Portability for On-the-Go Lifestyles: Mason jar salads are the quintessential grab-and-go meal. Whether you're commuting, heading to the park, or simply eating at your desk, they travel beautifully, making healthy choices accessible anywhere.
- Making Healthy the Easiest Choice: We've all been there – stressed, tired, and reaching for the quickest, often least healthy, option. A pre-packed jar salad in the fridge removes decision fatigue, making the nutritious choice the path of least resistance.
Beyond these practical advantages, how to pack a salad in a jar empowers you with control over your ingredients, allowing for personalized nutrition and significant savings compared to daily takeout.
The Art of Layering: Mastering the Mason Jar Salad Order
The single most critical factor for a successful, week-long fresh salad in a jar is the packing order. The golden rule is simple: keep your wet ingredients away from your greens. This strategic separation ensures that every component retains its ideal texture until you're ready to enjoy it. Imagine the dressing acting as a flavor reservoir at the bottom, slowly infusing the hardier ingredients, while your leafy greens remain untouched and vibrant at the very top. If you ever wondered how to pack a salad in a jar - Article 2 might offer some alternative perspectives or advanced tips on this layering technique!
Here’s the definitive layering formula to ensure perfect freshness every time:
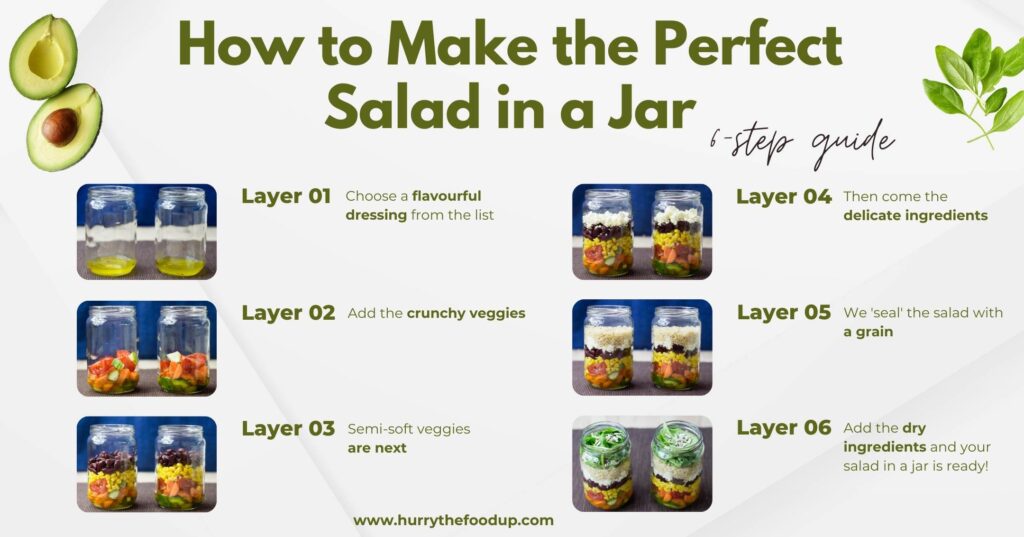
- Layer 1: The Flavor Foundation (Dressing)
Start by pouring your chosen salad dressing directly into the bottom of the jar. This is the wettest ingredient and its placement here protects everything above it. About 2-4 tablespoons is usually sufficient, depending on your jar size and preference. - Layer 2: Hardy Heroes (Crunchy Vegetables)
Next come your dense, non-absorbent vegetables that can withstand sitting in dressing without becoming mushy. Think carrots, cucumbers, bell peppers, celery, radishes, or cherry tomatoes. These sturdy veggies form a protective buffer between the dressing and more delicate ingredients. - Layer 3: The Heart of the Meal (Proteins & Grains)
This layer adds substance and satiety. Incorporate your cooked grains (quinoa, farro, couscous), beans (chickpeas, black beans), lentils, hard-boiled eggs, cooked chicken, tofu, or pasta. These ingredients are robust enough to handle some moisture from below but won't become soggy. - Layer 4: Delicate Delights & Toppings (Softer Ingredients)
Here's where you add softer ingredients, cheeses, nuts, seeds, and dried fruits. Feta, goat cheese, shredded cheddar, sunflower seeds, walnuts, dried cranberries, and olives fit perfectly here. If you're including avocado, a pro tip is to add it right before eating, or toss it with a squeeze of lemon juice to prevent browning if packing ahead. - Layer 5: The Fresh Finale (Leafy Greens)
Finally, fill the remaining space with your chosen leafy greens: lettuce (romaine, butter lettuce), spinach, arugula, kale, or mixed greens. Pack them in loosely but fully to maximize space. This top layer stays completely dry and crisp until it's time to eat.
Remember to leave a small amount of headspace at the very top of the jar for easy shaking when you're ready to serve.
Choosing the Right Tools: Jars and Dressings
When it comes to the best jars for your salad creations, versatility is key. While all sizes of mason jars can work, most people find wide-mouth jars (pint or quart size) to be the easiest to pack and retrieve ingredients from. A pint-sized jar is often ideal for a side salad, while a quart-sized jar provides a generous, filling main course. The wide opening simplifies the layering process and makes it easier to dump your salad into a bowl or even eat directly from the jar.
As for dressings, you don't need anything fancy. Whatever homemade or store-bought dressing you enjoy will work beautifully. However, a small consideration for portability: thicker dressings (like creamy ranch, hummus-based, or Greek yogurt dressings) tend to stay put better at the bottom of the jar during transport compared to very thin vinaigrettes. If you prefer a thinner dressing, ensure your jar lid is tightly sealed, or consider packing a very thin dressing in a separate small container to add just before eating for ultimate control.
Beyond the Basics: Advanced Tips for Your Jar Salad Journey
Once you’ve mastered the fundamental layering technique, you can elevate your jar salad game with a few extra tips:
- Thoroughly Dry Your Greens: This is a non-negotiable step. Excess moisture on your greens is the enemy of freshness. Use a salad spinner or paper towels to ensure they are completely dry before adding them to the jar.
- Chop Uniformly: Aim for consistent sizing of your ingredients where possible. This not only makes for a more aesthetically pleasing salad but also ensures even distribution of flavors and easier eating.
- Embrace Variety: Don't get stuck in a rut! Experiment with different cuisines – Mediterranean, Mexican, Asian, or classic American. Rotate your proteins, grains, and vegetables to keep your taste buds excited and ensure a wide array of nutrients. For even more specific ingredient guides and recipe ideas, how to pack a salad in a jar - Article 3 has you covered.
- Proper Storage is Key: Always store your packed jars upright in the refrigerator. This maintains the integrity of the layers, preventing the dressing from seeping into the greens.
- Serving with Ease: When lunch time arrives, simply unscrew the lid, shake the jar vigorously to distribute the dressing and mix the ingredients, and then either eat directly from the jar or dump it into a bowl.
- Dietary Customization: Mason jar salads are incredibly versatile. Easily adapt them for vegetarian, vegan, gluten-free, or low-carb diets by selecting appropriate ingredients for each layer.
Mastering how to pack a salad in a jar is more than just a meal prep hack; it's a lifestyle upgrade. It brings convenience, nutrition, and joy back to lunchtime, proving that healthy eating doesn't have to be complicated or time-consuming. By following these simple steps, you'll embark on a delicious journey where fresh, vibrant salads are always within reach, simplifying your week and nourishing your body.
